DIFFUSION 系列笔记| Latent Diffusion Model
相对于 DDIM, DDPM 以及 SDE,High-Resolution Image Synthesis with Latent Diffusion Models 一文重点在于 latent Space 和 Conditioning Cross Attention,而非 diffusion pipeline 流程。
以此不同于前几份笔记,本文主要参考 huggingface/diffusers 中 Latent Diffusion Model 及 Stable Diffusion 的实现,对 LDM 架构及其中的 Conditioning Cross Attention 做梳理。
系列笔记
- Kevin 吴嘉文:Diffusion|DDPM 理解、数学、代码
- Kevin 吴嘉文:DIFFUSION 系列笔记|DDIM 数学、思考与 ppdiffuser 代码探索
- Kevin 吴嘉文:DIFFUSION 系列笔记| SDE(上)
Latent Diffusion Model
论文:High-Resolution Image Synthesis with Latent Diffusion Models
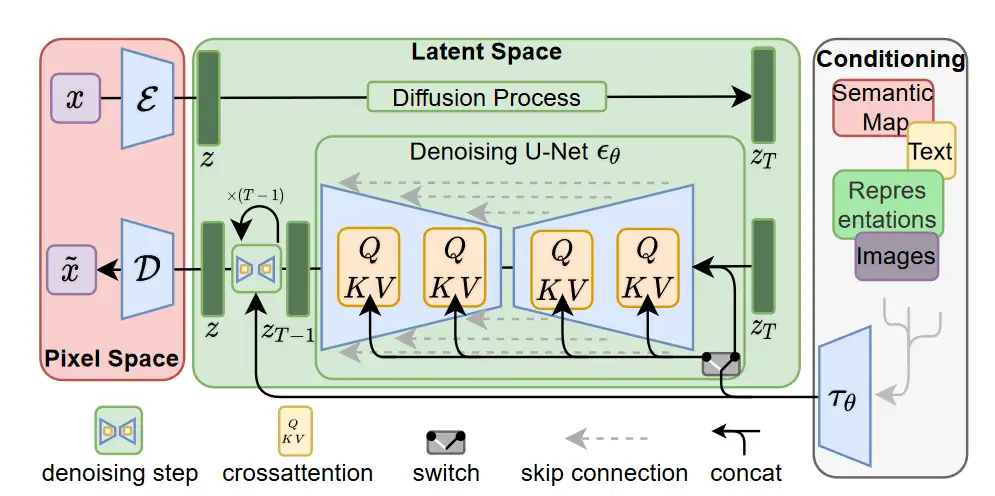
LDM 主要思想
扩散模型(DMs)直接在像素领域工作,优化和推断都很费时。为了在有限的计算资源上训练它们,LDM 先使用一个预训练好的 AutoEncoder,将图片像素转换到了维度较小的 latent space 上,而后再进行传统的扩散模型推理与优化。这种训练方式使得 LDM 在算力和性能之间得到了平衡。
此外,通过引入交叉注意力,使得 DMs 能够在条件生成上有不错的效果,包括如文字生成图片,inpainting 等。
LDM 使用示例
huggingface Diffusers 将各种 Diffusion Model Pipeline 都包装好了,使用 Diffusion model 就和使用 Transformers 一样地方便:
from diffusers import DiffusionPipeline

# load model and scheduler
ldm = DiffusionPipeline.from_pretrained("CompVis/ldm-text2im-large-256")
 # run pipeline in inference (sample random noise and denoise)
prompt = "A painting of a squirrel eating a burger"

images = ldm([prompt], num_inference_steps=50, eta=0.3, guidance_scale=6).images

# save images
for idx, image in enumerate(images):
    image.save(f"squirrel-{idx}.png")
LDM Pipeline
LDM 的 pipeline 可以简化表示为:Pipeline(prompt, num_inference_steps, latents)。我们暂时考虑没有 negative prompt 和 初始 latent 的输入,那么整个采样过程大致可以表示为:
- 首先采用了 BERT 架构模型对 prompt 进行处理,生成
text_hidden_state;同时生成随机噪声latents。
text_hidden_state = LDMBERT(prompt) # shape=[bs, len_seq, d_model] = [1, 77, 1280]
latents = randn_tensor(latents_shape)
对于 "CompVis/ldm-text2im-large-256",其中使用了 LDMBert, 参考 huggignface 的 LDMBert 实现,LDMBert 与传统 BERT 架构相似,规模不同,LDMBert 采用 32 层, hidden_size 为 1280,属实比 bert-base 大上不少。同时文本被 padding 到了固定的 77 长度,以此来保证文字的 hidden state 格式为 [batch_size, 77, 1280]。
- 之后进行传统的扩散模型 backward process:
for t in self.progress_bar(self.scheduler.timesteps):
    noise_pred = self.unet(latents_input, t, encoder_hidden_states=context).sample
    # compute the previous noisy sample x_t -> x_t-1
    latents = self.scheduler.step(noise_pred, t, latents, **extra_kwargs).prev_sample
其中 UNET 为 UNet2DConditionModel,与传统 Unet 不同在于其应用了 Cross Attention 对文字以及图片信息进行综合处理,下文会对改模块做梳理。scheduler 可以选 DDIM 或者其他算法。
- 最后对 latent hidden state 进行 decode,生成图片:
latents = 1 / self.vqvae.config.scaling_factor * latents
image = self.vqvae.decode(latents).sample
LDM 中的 UNET
backward process 中的 self.unet(...),即 UNET2DCondition(sample, timestep, encoder_hidden_state) 前向推导可以看成五部分,(以下以 CompVis/ldm-text2im-large-256 为例介绍):
- 准备 time steps :Timesteps 编码信息是 diffusion 中 predict noise residual 模型的标配:
# 经过两次映射得到 timesteps 对应的 embedding
t_emb = self.time_proj(timesteps)
emb = self.time_embedding(t_emb, timestep_cond)
- pre-process: LDM 只用了一个 2D 卷积对输入的 hidden state 进行处理
sample = nn.Conv2d(
            in_channels, block_out_channels[0], kernel_size=conv_in_kernel, padding=conv_in_padding
        )(sample)
- down sampling :down sampling 包括了 3 个
CrossAttnDownBlock2D, 和 1 个DownBlock2D。
# down sampling 大致前向推导
down_block_res_samples = (sample,)
for downsample_block in self.down_blocks:
    sample, res_samples = downsample_block(hidden_states=sample, temb=emb, scale=lora_scale)
    # 用于 UNET 的残差链接
    down_block_res_samples += res_samples
其中每个 CrossAttnDownBlock2D 大概前向过程为:
# CrossAttnDownBlock2D
def forward(self, hidden_states, temb, encoder_hidden_states=None)
	output_states = ()
    for resnet, attn in zip(self.resnets, self.attentions):
        hidden_states = resnet(hidden_states, temb)
        hidden_states = attn(
            hidden_states,
            encoder_hidden_states=encoder_hidden_states,
            cross_attention_kwargs=cross_attention_kwargs,
        ).sample
        output_states += (hidden_states,)

    # downsampler = Conv2D
    hidden_states = downsampler(hidden_states)
    output_states += (hidden_states,)

    return hidden_states, output_states
在 CompVis/ldm-text2im-large-256 中,每个 CrossAttnDownBlock2D 包含了 2 个 attn(Transformer2DModel)以及 2 个 resnet (ResnetBlock2D)。
文字与图像的交互就发生在 Transformer2DModel 当中。每个 Transformer2DModel 先对输入的图像数据进行预处理,将图片格式从如 (batch_size, channel, width, height) 或 (batch_size, num_image_vectors) 转换为 (batch_size, len_seq, hidden_size),而后将 hidden_states 传入 1 层传统 Transformer layer(非 bert 或 GPT 类型),先对图像 hidden_states 进行 self-attention,而后结合 encoder_hidden_states 进行 cross attention 处理。
- mid processing:
sample = MidBlock2DCrossAttn()(sample,
                              emb,
                           encoder_hidden_states)
在 CompVis/ldm-text2im-large-256 中,upsampling 和 down sampling 之间采用 MidBlock2DCrossAttn 连接,MidBlock2DCrossAttn 包括了 1 个 1 层的 Transformer2DModel 以及 1 个 resnet ResnetBlock2D。
- upsampling :upsampling 采用的模块 UpBlocks 包括了
("UpBlock2D", "CrossAttnUpBlock2D", "CrossAttnUpBlock2D", "CrossAttnUpBlock2D"),各个模块的架构与 down sampling 中的模块相似。
# upsample_block
for i, upsample_block in enumerate(self.up_blocks):
    sample = upsample_block(
                    hidden_states=sample,
                    temb=emb,
                    res_hidden_states_tuple=res_samples,
                    upsample_size=upsample_size,
                    scale=lora_scale,
                )
- post-process
# GroupNorm
sample = self.conv_norm_out(sample)
# Silu
sample = self.conv_act(sample)
# Conv2d(320, 4, kernel=(3,3), s=(1,1), padding=(1,1))
sample = self.conv_out(sample)
总结起来,down sampling,midprocess,upsampling 三个步骤中都涉及到了 Transformer2DModel ,实现多模态的信息交互。
LDM Super Resolution Pipeline
low_res_img = Image.open(BytesIO(response.content)).convert("RGB")
low_res_img = low_res_img.resize((128, 128)

upscaled_image = pipeline(low_res_img, num_inference_steps=100, eta=1).images[0]
upscaled_image.save("ldm_generated_image.png")
大致前项推导流程可以概括为:
- 根据 输入图片大小,生成对应的 latent 噪音以及 time step embedding:
latents = randn_tensor(latents_shape, generator=generator, device=self.device, dtype=latents_dtype)  # shape 与输入图片相同
latents = latents * self.scheduler.init_noise_sigma
- 将 latent 与原始图片拼接,然后进行 diffusion 反向推导:
for t in self.progress_bar(timesteps_tensor):
    # concat latents and low resolution image in the channel dimension.
    latents_input = torch.cat([latents, image], dim=1)
    latents_input = self.scheduler.scale_model_input(latents_input, t)
    # predict the noise residual
    noise_pred = self.unet(latents_input, t).sample
    # compute the previous noisy sample x_t -> x_t-1
    latents = self.scheduler.step(noise_pred, t, latents, **extra_kwargs).prev_sample
- 使用 vqvae 对 latent 进行解码,得到最终图片
# decode the image latents with the VQVAE
image = self.vqvae.decode(latents).sample
image = torch.clamp(image, -1.0, 1.0)
image = image / 2 + 0.5
image = image.cpu().permute(0, 2, 3, 1).numpy()
Stable diffusion
SD v1 架构
参考 hugging face diffuser 的 SD pipeline 实现。以 stable-diffusion-v1-5 为例。
- Text Encoder
采用 CLIPTextModel,来自于 CLIP 的 Text Encoder 部分。相比于其他传统的 Transformer 语言模型,CLIP 在预训练时,在 text-image pair 数据集上进行了对比学习预训练。prompt_embeds, negative_prompt_embeds 在经过编码后,shape 都为 [batch_size, 77, 768]
- Diffusion 反向采样过程
SD v1.5 采样过程与 LDM 相似,其中的 latents 大小为 [bs, 4, 64, 64]。对于 txt2img,latents 通过随机生成,对于 img2img,latents 通过 VAE 模型进行 encode。
Unet 配置与 LDM 相似:
down sampling 采用 3 个
CrossAttnDownBlock2D, 和 1 个DownBlock2D。mid block 采用 1 个
MidBlock2DCrossAttn。hidden size = 1280Up sampling 采用 1 个
UpBlock2D+ 3 个CrossAttnUpBlock2D
每个 CrossAttn 的 transformer 中, text embedding 大小为 768,但 Transformer 模块的 hidden size 随着 Unet 深入而增加。如 down sampling 采用的维度为 320, 640, 1280, 1280。那么 3 个 Transformer 模块中的 hidden size 就分别是 320, 640, 1280。
以 down sampling 为例,在进行 cross attention 时候,图像的 hidden state (latent)大小分别被映射到了 [4096, 320],[2014, 640],[256, 1280] ,而后与文字的 hidden state [77, 768] 进行 cross attention 计算。(以上张量维度省略了 batch size)
# hidden size 为 320 时候的 cross attention 单元示例
Attention(
(to_q): LoRACompatibleLinear(in_features=320, out_features=320, bias=False)
(to_k): LoRACompatibleLinear(in_features=768, out_features=320, bias=False)
(to_v): LoRACompatibleLinear(in_features=768, out_features=320, bias=False)
)
这也是 SD Unet 中 Transformer2DBlock 与传统 Transformer 主要的不同,SD Unet 中的 Transformer2DBlock 输入与输出维度是不一样的。
- super resolution
生成后 latent 大小为 64 * 64, 通过 VQModel 解码为 512*512
SD v1.1 - v1.5
stable diffusion 1.1-1.5 的模型架构相同,以下搬运 runwayml 的 stable diffusion weights 总结:
sd-v1-1.ckpt: 237k steps at resolution256x256on laion2B-en. 194k steps at resolution512x512on laion-high-resolution (170M examples from LAION-5B with resolution>= 1024x1024).sd-v1-2.ckpt: Resumed fromsd-v1-1.ckpt. 515k steps at resolution512x512on laion-aesthetics v2 5+ (a subset of laion2B-en with estimated aesthetics score> 5.0, and additionally filtered to images with an original size>= 512x512, and an estimated watermark probability< 0.5. The watermark estimate is from the LAION-5B metadata, the aesthetics score is estimated using the LAION-Aesthetics Predictor V2).sd-v1-3.ckpt: Resumed fromsd-v1-2.ckpt. 195k steps at resolution512x512on "laion-aesthetics v2 5+" and 10% dropping of the text-conditioning to improve classifier-free guidance sampling.sd-v1-4.ckpt: Resumed fromsd-v1-2.ckpt. 225k steps at resolution512x512on "laion-aesthetics v2 5+" and 10% dropping of the text-conditioning to improve classifier-free guidance sampling.sd-v1-5.ckpt: Resumed fromsd-v1-2.ckpt. 595k steps at resolution512x512on "laion-aesthetics v2 5+" and 10% dropping of the text-conditioning to improve classifier-free guidance sampling.sd-v1-5-inpainting.ckpt: Resumed fromsd-v1-5.ckpt. 440k steps of inpainting training at resolution512x512on "laion-aesthetics v2 5+" and 10% dropping of the text-conditioning to improve classifier-free guidance sampling. For inpainting, the UNet has 5 additional input channels (4 for the encoded masked-image and 1 for the mask itself) whose weights were zero-initialized after restoring the non-inpainting checkpoint. During training, we generate synthetic masks and in 25% mask everything.
SD v2
参考 stability-AI 仓库,SD v2 相对 v1 系列改动较大:
架构方面 SD v2 系列:
- 采用了 OpenCLIP-ViT/H 作为 text encoder。
- Unet 架构改变:其中 Transformer 模块中的
attention_head_dim变为了5,10,20,20,SD v1 中为8,8,8,8。cross_attention_dim从 768 变为 1280。同时在 latent hidden state 进入 cross attention 之前,额外采用了linear_projection进行 latent hidden state 的处理,SD v1 中为卷积层处理。
训练方面 SD v2 系列,(以下拷贝了 huggingface 中 SD 模型 model card 的介绍) :
- SD 2.0-base:The model is trained from scratch 550k steps at resolution
256x256on a subset of LAION-5B filtered for explicit pornographic material, using the LAION-NSFW classifier withpunsafe=0.1and an aesthetic score >=4.5. Then it is further trained for 850k steps at resolution512x512on the same dataset on images with resolution>= 512x512. - SD v2.0:This
stable-diffusion-2model is resumed from stable-diffusion-2-base (512-base-ema.ckpt) and trained for 150k steps using a v-objective on the same dataset. Resumed for another 140k steps on768x768images. - SD v2.1:This
stable-diffusion-2-1model is fine-tuned from stable-diffusion-2 (768-v-ema.ckpt) with an additional 55k steps on the same dataset (withpunsafe=0.1), and then fine-tuned for another 155k extra steps withpunsafe=0.98.
Lora
huggingface diffuser 中 Lora 的实现与 huggingface/PEFT 实现方法相似,添加 Lora 只需要通过撰写规则,锁定需要改动的 layer,并替换为 LoRACompatibleLayer 实现,huggingface 也提供好了 lora 训练代码,和 SD lora 推理方法。
Diffusers 中,SD 采用 Lora 的部分位于 Unet 当中,大部分的 Lora 在 Transformer 模块当中,SD 的 lora 与 NLP Lora 实现方式基本相同, 一个较大的区别在于,SD 中的 Lora 除了对线性层进行 Lora 叠加外,也对卷积层进行了 Lora 改造 。